
[Note: Parts of this article may not be relevant if you are using Unity3D version 4.6 and above.]
This article will be a basic minimap tutorial for Unity3D, starting from setting up and positioning the camera, through to getting arrows and icons to rotate, reflecting their ‘real-world’ direction. Some code, and images will be provided.
Firstly, create your scene and populate it with your character (at least a first-person prefab), and a surface to walk on, if you haven’t already done so.
Next, we’ll create a camera for the minimap. Select GameObject > Create Other > Camera and rename the new camera to MinimapCamera.
If you press play now, you’ll notice a stream of errors: “There are 2 audio listeners in the scene. Please ensure there is always exactly one audio listener in the scene.“. Select the MinimapCamera and remove its Audio Listener component in the inspector. You’d also have noticed we can’t see the camera’s output on the screen yet.
Stop play, and select the MinimapCamera in the Hierarchy panel: we’ll set its Viewport Rect variables to the following: X: 0.03, Y: 0.04, W: 0.3, H: 0.32 and set the Depth to 1. Press play to test. You should have seen the mini camera window.
Stop play. Now we’ll need to orient and focus the camera to face downwards, with a map-like view. Set the MinimapCamera Projection option to Orthographic, set the X rotation to 90, and ensure the Y position is something positive, we can use 50 for now.
Press play, and the minimap should be pointing at the floor now, even though it doesn’t move with you. Here’s what I have:

Stop play. Next we need to decide how the map with work in relation with the player. Do we want it to rotate with the player, or stay straight? We’ll sample both.
For an experiment, we’ll make the MinimapCamera a child of the player, to allow it to rotate with the player — but first we’ll need to sort out the positioning: I set the MinimapCamera’s X and Z values to 0, and the players, X and Z values to 0. Then in the Hierarchy panel, I dragged the Minimap camera onto the player object to make it a child object that derives its position and rotation from the player. Then I set the player object to a desirable point. Here’s what I have:

This is the current hierarchy view:

Now we can set the zoom. Simply use the MinimapCamera’s Size slider to set a value according to taste.
If you want the minimap to follow you, but not rotate, which is more normal, you can use a script to follow your player’s X and Z position instead. You’ll need to un-parent the MinimapCamera so it’s by itself again, and apply this tiny JavaScript ‘MinimapFollowNoRotate‘ to the MinimapCamera (and be sure to drag the player/target object onto it in the Inspector.
Your hierarchy should look like this if you are keeping the non-rotation camera:

Now we’ll deal with the issue of abstraction. You’ve noticed that you see your actual character from the top, but most games you play will have you abstracted down to something like an arrow. How do you remove yourself from the MinimapCamera, and have an arrow instead?
You’ll make use of Layers.
To test this, I’ve set up an experiment: A large green object now sits between my player and the map camera, and there’s also a small black cube:

My objective will be to show the wall, and the ground (and any other objects I choose) but not the green object, the player or the black cube. The player will be added in as an arrow in a minute.
Related aside: if you make a 3D model of, say, a building, you should keep the floor and walls separate from the ceiling (and other camera obstructions). This allows you to tag the floor and walls as viewable on the minimap, but not the ceilings. Of course, if you have a multi-floor building, you will need to define some way of showing your current floor only.
In the Inspector, add a new Layer (from the location pictured below), and add a new user layer, I called mine ‘minimapcansee’ but you can use any term not already in use.

Set the layer of the floor and any other objects, besides the player and ceilings to the new layer you created (minimapcansee for me). Next, select your minimap camera and set the Culling Mask so that only your new layer is ticked, like the image below:

At this point, we should also improve visuals by setting the Clear Flags option to Solid Color, and setting the Background to something like black, so if we reach the edge of the map, we don’t see sky on the minimap.
The image below shows the result:

I can see all objects from the player view, but the minimap camera is only seeing the objects in the ‘minimapcansee’ layer: the floor and the wall.
Now for the player arrow. This will require some set-up. Firstly make yourself an appropriate arrow. Keep it small, and keep the transparency intact by saving it as a PNG. My particular arrow measured 15px by 15px. Import the image into Unity3D, select it in the Project panel, and set the texture options to Texture Type: GUI, Filter Mode: Bilinear. You may need to use other options depending on what you imported, but those are most likely to be suitable.
Next we’ll start a JavaScript to handle the arrow rotation:
Attach this to the MinimapCamera, and be sure to drag in the player object, minimap camera object and player arrow texture.
To explain this script: First it checks to see that the minimap is enabled, else it will draw the arrow when the map is off (if you have implemented a toggle — we’ll look at that in a minute). Next it grabs the angle of the player for use in the rotation. In between the GUI.matrix start and end lines, those components that are drawn will be rotated according to meAngle and pivotMe.
The DrawTexture lines aim to have me drawn in the centre of the minimap — you’ll need to work out something slightly different if your targets are not to be centered.
The line below translates from 3D space to 2D space:
In our example, currently the angles are correct, but the player arrow moves sideways compared to the 3D view. We’ll change that by changing the MinimapCamera’s Y rotation from 0 to 180, and changing a line in the above script to:
Now things should be aligned properly. Here is me staring at the wall:

If you want to implement a minimap On/Off toggle button, it should be very simple. The following line will do it, and it will work with our ‘minimap enabled’ check earlier, to ensure arrows are not drawn on the screen when the map is off. In the Update function, paste this and test it by pressing ‘M’.
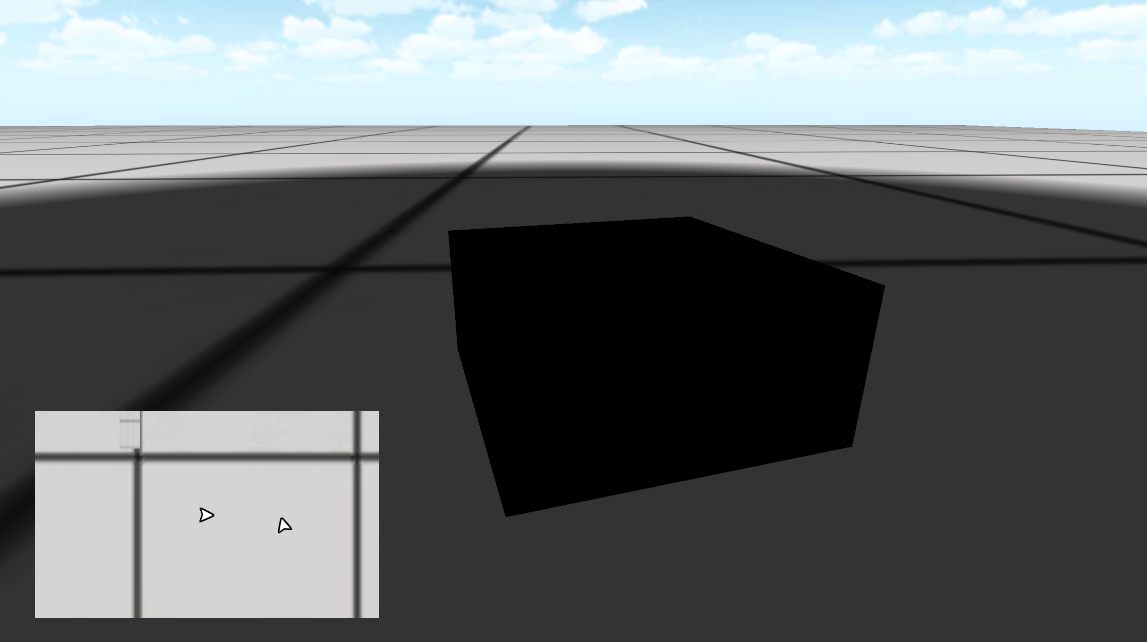
Now we’ll try adding another arrow to the scene. I will take that black cube from earlier (not visible on minimap) and I’ll add a simple rotation script to it:
Then in the minimap script, I’ll add variables for that object, and set up the code for it to show up as a rotating arrow. The modified script is below (don’t forget to assign the cube in the Inspector):
Here’s me staring at the rotating cube, and you can see both arrows:
You can see from the script that each GUI rotation needs a separate pivot and angle per target object. How might you handle this in a multiplayer scene, with players joining and leaving? Perhaps a function that periodically checks for objects tagged as players might work…
This is a pretty basic minimap, but it does have useful and expandable functionality. There is stuff that would need to be cleaned up and restricted (for example, the arrows will draw off the edge of the map view). As another experiment, you could perhaps try to figure out how to have icons at the edges of the minimap to represent objects and targets out of view, in those directions.
Pingback: Basic Unity3D minimap tutorial article | VISUALS+CODE
Very good tutorial, keep up the good work!
The best minimap tutorial I’ve found. Great job!
Hi there,
What is the approach to actually add some GUI elements to the minimap so it looks cool ?
Also nice tutorial, a minimap is not a simple thing to do. There is lots of things you can do with layers,etc.